Wednesday, 15 February 2017

    Creating Circular referencing in Hibernate


There are situations when we need to create tree json. For that we need to create self join on the same Entity to make Parent child relationship on same entity.

Following is the  example:

            @Entity
            @Table(name = "tree")
             public class Tree implements Serializable {

                  private static final long serialVersionUID = 663408095532480033L;

                  @Id
          @GeneratedValue(strategy=GenerationType.AUTO)
                  @Column(name="id")
                   private String id;

                  @Column(name="fruit")
                  private String fruit ;

                 @ManyToOne
                 @JoinColumn(name="child_id", nullable=false)
                  private Tree rootId;

}

When you will try to retrieve the following entity you will get Child First and inside it will get parents.

In order to retrieve parent first and then inside get childs following should be the structure.


            @Entity
            @Table(name = "tree")
             public class Tree implements Serializable {

                  private static final long serialVersionUID = 663408095532480033L;

                  @Id
          @GeneratedValue(strategy=GenerationType.AUTO)
                  @Column(name="id")
                   private String id;

                  @Column(name="fruit")
                  private String fruit ;

                 @ManyToOne
                 @JoinColumn(name="child_id", nullable=false)
                  private Tree rootId;

                 @OneToMany(mappedBy=rootId)
                 private List<Tree> children;

           }

Here when you will return the entity to frontend user issue of infinite json refrencing will come in order to resolve the issue need to add json annotations in entity that is following :

            @Entity
            @Table(name = "tree")
             public class Tree implements Serializable {

                  private static final long serialVersionUID = 663408095532480033L;

                  @Id
          @GeneratedValue(strategy=GenerationType.AUTO)
                  @Column(name="id")
                   private String id;

                  @Column(name="fruit")
                  private String fruit ;

                 @ManyToOne
                 @JoinColumn(name="child_id", nullable=false)
                 @JsonBackReference
                  private Tree rootId;

                 @OneToMany(mappedBy=rootId)
                 @JsonManagedReference
                 private List<Tree> children;

           }

Enitity would return the  following Json:

[
  {
    "id": "1",
    "fruit": "ROOT",
    "child": [
      {
        "id": "2",
        "fruit": "CHILD",
        "child": [
          {
            "id": "3",
            "fruit": "CHILD1",
            "child": []
          }
        ]
      }
    ]
  },
  {
    "id": "4",
    "fruit": "Root",
    "child": [
      {
        "id": "5,
        "fruit": " Root Child 1",
        "child": [
          {
            "id": "6",
            "fruit": " Root Child 2"
            "child": []
          }
        ]
      }
]

Hope this will help happycoding. :)

Wednesday, 19 October 2016

HOW TO CREATE USER AND ROLES  ON JASPER SERVER


To access reports on JasperServer we need to have a user account which includes ID and Password.
Roles are created to determine which user can access which repository.User can have multiple roles.

An administrator can create roles and users on JasperServer and assign roles to user.Set roles permission on repository .


 Creating Roles

 Following are the steps to create roles :

 1.) Login to jasperserver admin account.

 2.) Select manage role then click on add role.

 3.) Enter the desired role name.


If existing role is selected then users assigned to the role gets listed out.


Creating Users

On Home page go to Manage select add roles.

Following are the steps to create new users .

1.) On Manage Users page click Add User.

2.) Enter the desired UserName,UserPassword,UserId,ConfirmPassword and ResetPassword.


Click the enable user check box.

3.) Click on Add User Now the User will appear in the User list.

4.) Repeat the steps for adding new Users.

Assigning Users

Following are the steps to assign users:

1.) From Home Page go to Manager -> Users.

2.) Select the desired User from the list and click on edit button.


3.) After clicking on Edit in the ROLE section two panes will open up. ROLES AVAILABLE and ROLES ASSIGNED.
    Select the ROLE FROM Available and click on Arrow if you want to assign the role.
    Select the ROLE FROM Assigned and click on Arrow if you want to deassign the role.


4.) Click on Save .Repeat the steps to add additional users.


Hope the above article helps. :)


Monday, 11 April 2016

               Lock time seconds issue in JasperServer


When we have a report deployed on JasperServer holding millions record .While exporting this report it takes more than 90 seconds to export which is the default time to load in Jasper in this case Error: Unable to acquire conversation lock after 90 seconds comes.
 
 
1.) To Resolve this issue we have to change internal configuration settings of Jasper i.e xml files.
 
 
2.) Open WEB-INF/jasperserver-servlet.xml  in Apache-Tomcat folder.Make change in follwing line :
 
<property name="lockTimeoutSeconds" value="90"/>
 
 Change the value field here
 
 
3.) Save changes and restart JasperServer.

Tuesday, 13 October 2015

How to resolve issue Drop ,Delete ,Alter commands taking long time?


Why this issue arises ?

This is probably due to Metadata locking .It is most common to see table gets struck in "Waiting for Metadata Locks". ..It comes basically due to some uncommitted Transactions.

Solution

In order to resolve this first we should wait for sometime for transaction to complete that might be using that table.If it is taking very long time then following are the steps to resolve this :

1.) Login Mysql 
     mysql -u root -p 
     ******

2.) RUN  

     Show Full Processlist.
     (Here you will get list of transactions that are creating lock on other transactions )

+-----+------+-----------+-------------------+---------+------+-------+------------------+
| Id  | User | Host      | db                | Command | Time | State | Info             |
+-----+------+-----------+-------------------+---------+------+-------+------------------+
| 404 | root | localhost | example           | Sleep   | 297  |       |                  |
| 410 | root | localhost |                   | Query   | 0    |       | show processlist |
+-----+------+-----------+-------------------+---------+------+-------+------------------+
 
Here process 404 is creating lock on other transactions.

3.) kill process 404 by running:

      kill 404

4.) If above process kill doesn't works then you can go for killing other processes as mentioned in  Step 3.

5.) Now try executing Drop ,Delete,Alter or any command it would now work correctly.


Above approach is a better approach instead of MySQL server restart.


Hope the above solution works .Looking forward for your questions and suggestions ..  :)

Tuesday, 18 August 2015

Create Routines in Jasper ETL  


What are Routine ? 

Routines are habits which do not change and are repeated every time . In Jasper ETL Routines are Java Methods or reusable code that are required generally in Jobs for manipulating data.

Below are the list of default System Routines present in Jasper ETL.


Creating Custom/User Defined Routines   

There could be a point when we would require to create our own methods and classes to transform data in our jobs.In that case we could create our own Routines also known as User Defined Routines.
Below is the procedure to create user defined routines :-

a.) Right Click Routines inside Code and click on Create Routine.

  b.) Normaly Create a Java Class in any IDE or Notepad which ever is better for you.

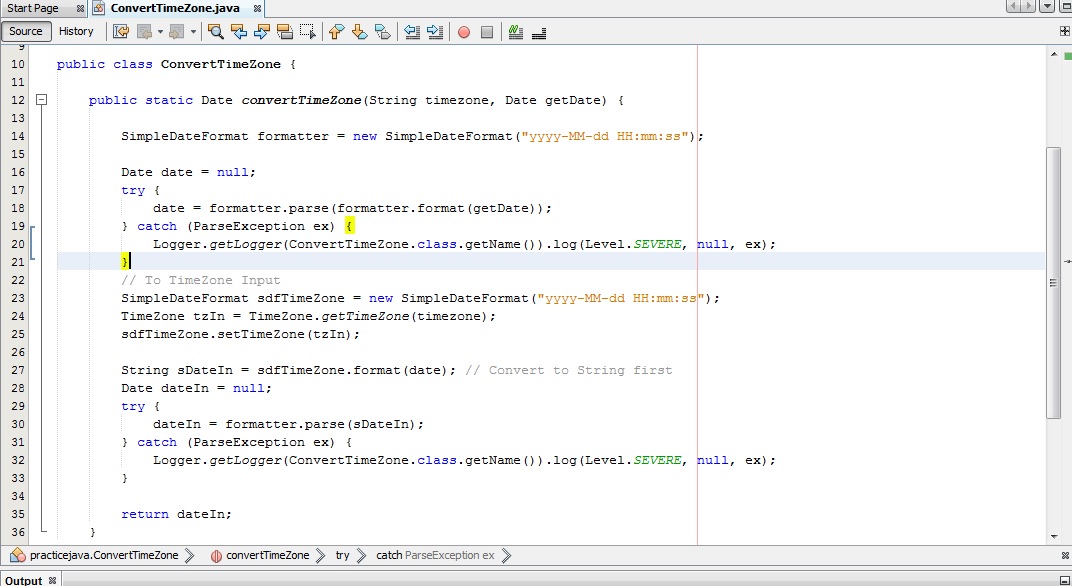
       For e.g Here is the code I first wrote in NetBeans to convert any timezone to UTC

c.) Paste the same code inside the Routines window opened and save it.


d.) No you could continue to use this method in your jobs.Inside Categories select User Defined you will see the method created by you.


NOTE : Always declare custom  Methods as Public Static so that it could be accessed publicly and shown inside User Defined option.

Hope you find this article helpful :) .

Friday, 13 February 2015

Scheduling Export of Reports to FTP Server from JasperServer

In this article I would like to demonstrate How we could export reports to a ftp server in Synchronization with Scheduling a job.
As there are client requirements that reports should be regular bulk export of data to the site or FTP server ,JasperServer has provided options that by Scheduling Job we could either mail reports to user send notifications to clients/user or could directly export reports to a FTP server or could choose both mailing and export of reports simultaneously as in my case.

First I would show you how we could export reports to an FTP server 

Preconditions :
1.) Working JasperServer either Community or Pro Edition
2.) There should be a report on JasperServer for Scheduling Job


Follow the following Steps to Schedule Job:

1.) Right Click on Report and Select Schedule Option.
 
2.) Click on Create Schedule.

3.) Under Schedule there are various options like 
  •   Schedule Start
  •   Recurrence Type
    Under Scheduled Start :  Selected  immediately and Under Recurrence Type : Selected Calender


4.) Under times select Hours and Minutes,Here I have chosen 0-23 for running every hour and 0 in minutes for running at start of every hour. 


5.) Select Output Options.

6.) In Output Options under Formats Select PDF Format and Enters FTP Details
      FTP Details :
  •      Server
  •      Directory
  •      UserName
  •      Password
     And Click on Test Connections to verify whether connection is successful or not


7.)  Final Step Click on Submit and Check the Scheduled Transfer of Reports on FTP Server.


Now the Scheduled export of reports on FTP server would work successfully .

I would also share video with all regarding the Steps.Hope you would find this article helpful ,

Thanks :)

Amit


Thursday, 4 December 2014

JasperSoft ETL

Lets First discuss about what is ETL.ETL stands for Extract Transform and Load.These terms refers to processes in Database and Data Warehousing that are combined into one tool to pull data from one database transform it and load it to another database .

  • Extract: Extracts data from homogeneous or heterogeneous data sources or databases
  • Transform:It is the process of converting extracted into desired form.Transformation occurs by using rules or look-up tables or by combining the data with other data.
  • Load :It means loading data into target database.


We need to install JasperSoft Etl (One of the tool to design jobs and run ETL).You could download  JasperSoft ETL from  the JasperSoft Community site http://community.jaspersoft.com/project/jaspersoft-etl/releases.

After you open JasperSoft ETL and create a project name , Here I have chosen project name as TestETLProcess .Window that would show-up is


Below are the steps to create ETL Process:

1.) First we need to create a job under Job Designs 

      a) Right click on Job Designs 
      b) Select Create Job
      c) Write Job Name and click Finish .


2.) Create DB connection of source db from where tables needs to be processed.
  
   a) Expand MetaData
   b) Then Click on DbConnection 
   c) Create the name of Db Connection and click on next.


3.) Select DB type For e.g I have selected mysql and fill rest of the requirements.


4.) Click on check connection to check if connection is successful or not . If the connection is successful then click finish.

5.) Make another Db connection  of the target database where we want to transfer database.

6.) Now we would retrieve schema of Source Db .
 
      a) Right click on source db (In my Case it is CouponDb ) select retrieve schema.
      b) After you click on retrieve schema the following window would pop-up.


    c) Click on Next.
    d) After you click on Next following window would popup in which click on Select All .
    
    e) Click on Next and then Click Finish.

7.)  Under CouponDb click on Table schemas and drag the tables which you want to transform and load on Target Database.

8.) I have selected Coupon and CouponCode tables and dragged them to Job window and selected tMySqlInput option.
    

  9.) In Palette on Right under Processing select tMap and drag it in job window.

 10.) Right Click on Coupon and CouponCode and select Row->Main and drag the line to tMap_1.
    

 11.) From Palette on right click on Databases->Mysql select tMysqlOutput .

 12.) Right click on tMap select Row->Main drag it to tMySqlOutput_1 .Select the name of row which you want (I have selected transform) .
  

13.) Double click tMap component.Drag coupon_code_id from coupon table to id column in couponcode table ,to make sure that it is a unique match.


14.) Now we will select columns we want to get and drag it to the right at transform table.


15.) Click Ok and close the component.

16.) Double click tMySqlOutput and fill the credentials of database and table name you want to set .
        In the action select Create Table if not exists and in Action on Data select Insert or Update.


    17.)Double click on Edit Schema to check the schema .


   18.) Click Ok and close the window.Now we will run the ETL and check Dataflow .

   19.) Press F6 to run ETL process and check dataflow .


Hope the article would be helpful .I would be looking forward to your comments suggestion and feedback.  ......Thanks :)